Getting started with Local as your WordPress development environment

While most websites are (naturally) hosted online, there are plenty of situations in which you may want to create a local WordPress site. For example, you might need to set up a staging environment to develop your site before it goes live, require a safe place to experiment with designs, or perform troubleshooting.

In any of those scenarios, all you’ll need is the right solution. When it comes to creating an offline WordPress site, Local is one of the most intuitive and powerful tools for the job. This solution makes it easy to install WordPress on your computer, clone your site, and even push your local version live.

Here’s what I’ll cover in this article:

Let’s get started!


An introduction to local website development

If you want people to visit your website, it will have to be hosted online. In fact, one of the first things you’ll typically do when setting up a new website is to sign up for a hosting plan.

However, there are times when you’ll want to work on a ‘public-inaccessible’ website. A ‘local site,’ also known as a ‘development site,’ is a website stored on your own computer. This means no one is able to access it unless they’re logged into that specific device (and have the right credentials).

Local sites have many applications. Some of the most common include:

  • Experimenting with and learning a new platform.
  • Building a new site offline, so no one will see it in its half-finished state.
  • Redesigning a live site, or otherwise making large-scale changes to it.
  • Performing troubleshooting, to fix a hack, error, or other issue.
  • Creating a site for a client, to keep it private but enable collaboration and feedback.

What’s more, you can create a permanently private local site, or make a copy of a live site so you have a version you can play around with. Once you’re happy with the changes to your local site, you can even upload them back to your live site (I’ll talk more about this later on).

Of course, to set up a local site you’ll need the right tool. There are lots of options available, including third-party solutions and applications offered by your hosting provider. Next up, let’s take a look at one of those tools.


Local: A development tool for WordPress sites

If you’re looking to create a local WordPress website, you can’t go wrong with Local.

This fully-featured tool contains everything you’ll need to set up and use local sites. It’s simple enough for beginners to use, but also offers plenty of advanced features if you want to customize the way your local environment works.

Some of Local’s key features include:

  • One-click WordPress installations, letting you set up your local sites fast
  • Local Secure Sockets Layer (SSL) support, to keep those sites safe
  • Easy access to your local sites’ root files, via Secure Shell (SSH) access
  • Shareable demo URLs, making it possible to show your site to select people
  • Customizable environments for developers, helping you configure the way your local site runs
  • The option to clone sites, export a live site to a local version, and push a local site to live hosting at Flywheel and WP Engine.
  • An Add-ons Library, allowing you to customize your local development environment with the features you need

Best of all, Local is completely free to use for Mac, Windows, and Linux. This means you can try it out without any risks or obligations involved. Let’s see how it works in action!


How to get started with Local (in 3 Steps)

Fortunately, setting up Local and using it to manage your local sites is a straightforward process. Over the next few sections, I’m going to walk through how to start using it. The process begins with installing the tool itself.

Step 1: Install Local

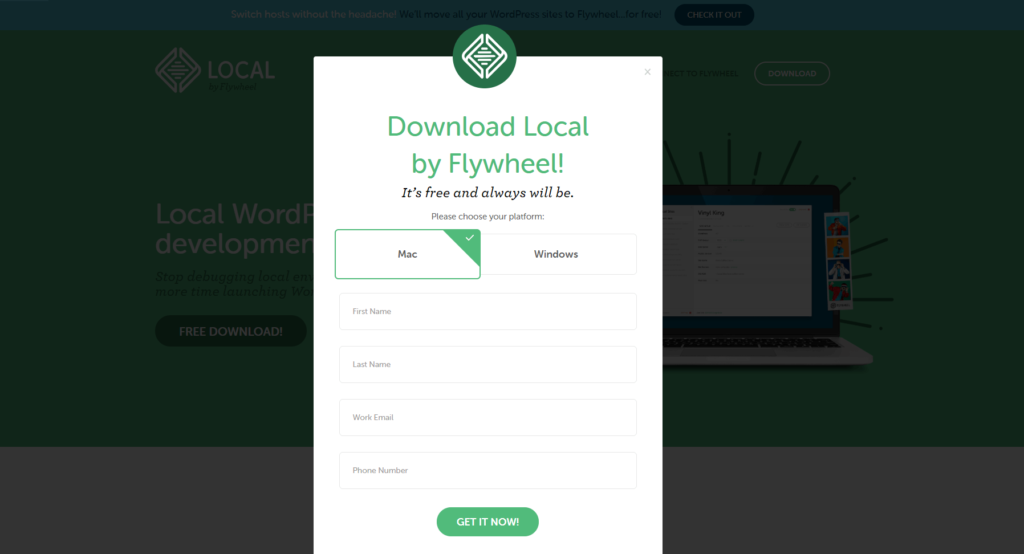
To download Local, visit the website and hit the Free Download button. Next, choose your platform, and enter some basic information (only the email field is mandatory, and it’s just so we can keep you in the loop on new features and functionality):

Your download should start right away. Give it a few moments, and then run the installer file. You’ll then be taken to a start-up screen, where you simply need to select the Let’s Go! button:

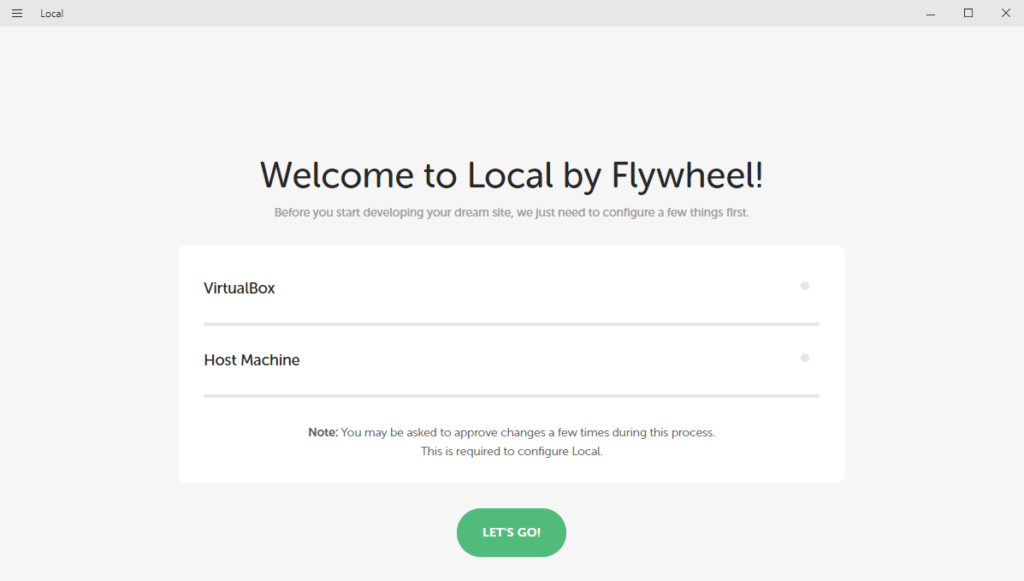
This will install a few programs that are required for Local to work properly. The installation may take a few minutes to complete. If you receive any prompts during the process, make sure to hit Yes to permit the installer to do its job.

After, you’ll be taken straight to your new Local dashboard:

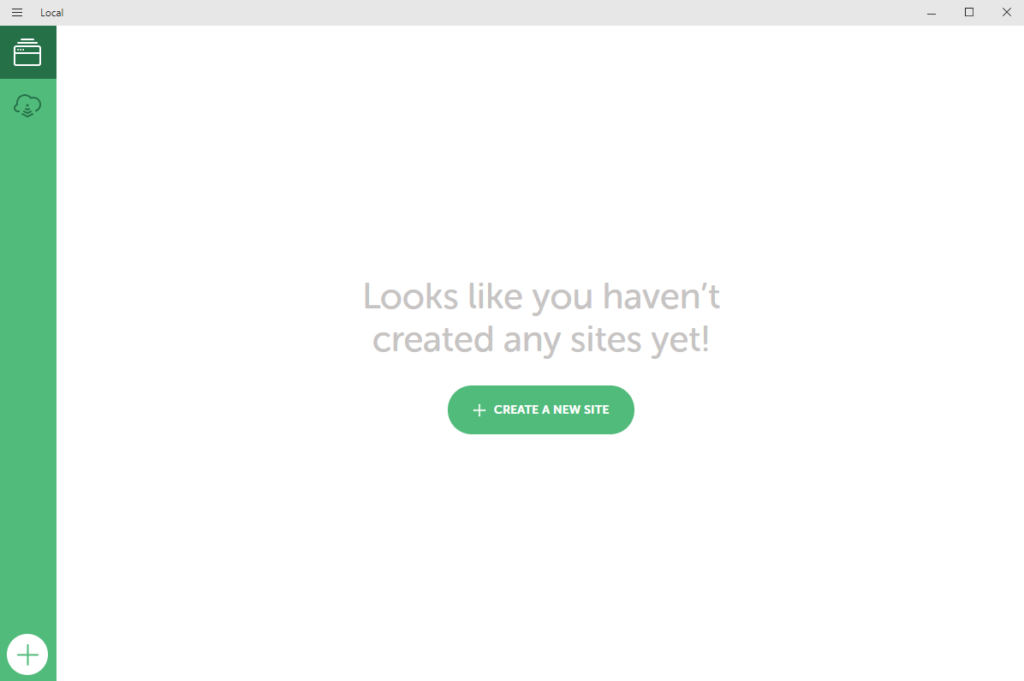
There are several options to choose from. You can create a new site, which I’ll talk about next. You can also select the cloud icon to connect to managed WordPress hosting services, enabling you to make copies of existing sites and push local sites live.

Finally, in the top-left corner there’s an “Options” menu to let you configure various settings and preferences. However, this is optional—right now you’re ready to create your first local site!

Step 2: Create your local WordPress site

Next up, let’s create a brand-new local WordPress website. To do so, select Create a New Site in your Local dashboard. This will take you to a simple setup wizard, where the first step is to create a name for your site:

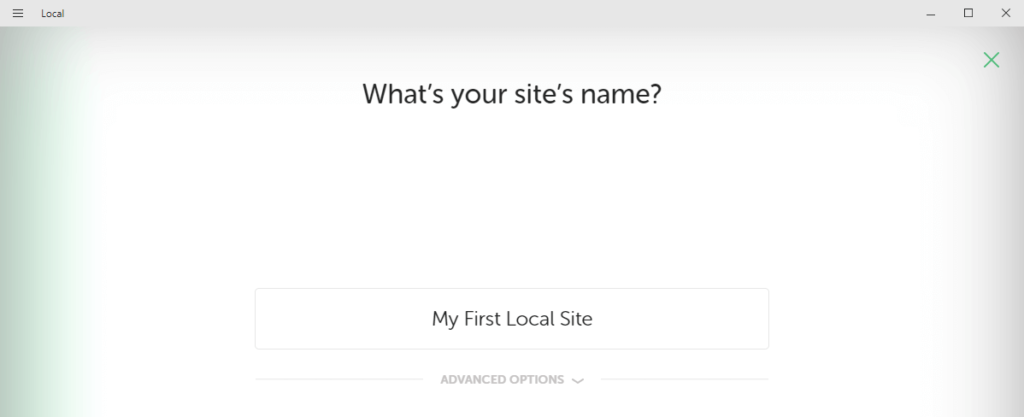
You may want to make this something descriptive, especially if you plan to create multiple local sites. You can always change the name of your site later on.

In addition, you can expand the Advanced Options tab to configure a few optional settings if you’d like:

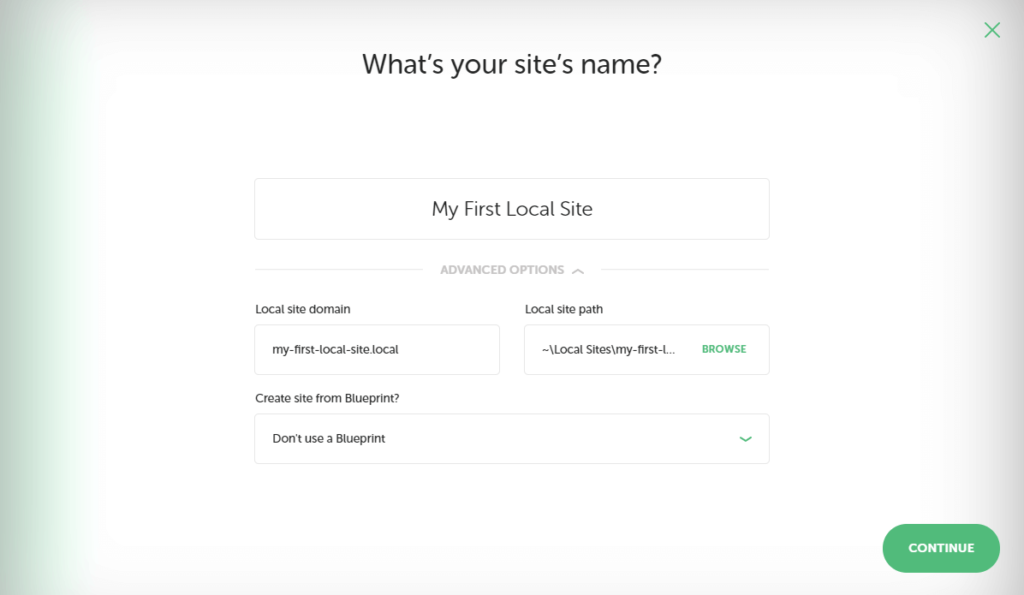
Here you can set a domain and path for your local site, You can choose any domain name and suffix that you’d like, and Local will modify your hosts file to make it work. In our case, we went with my-first-local-site.local.

Local will also automatically create a directory to store your site’s files, but you can also set it to any folder you like.

Once you’ve entered a name for your site, you can continue to the next screen:

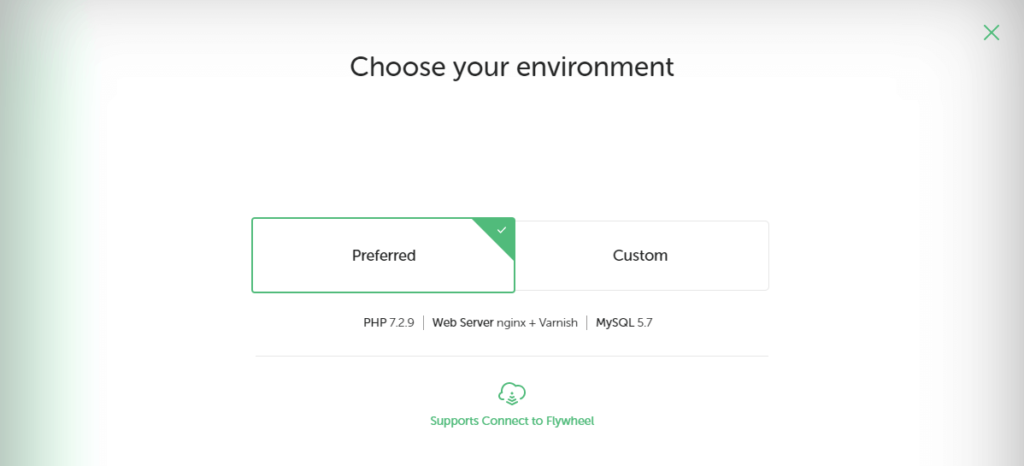
Here, you have two options. You can choose Preferred to set up your local site using a recommended set of tools, or select Custom to configure your environment:

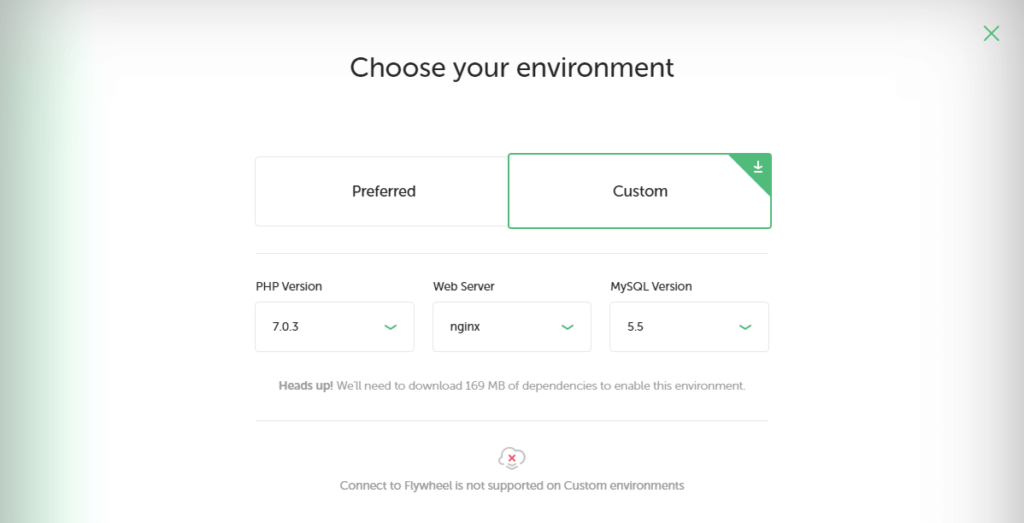
The Preferred option works well for most beginner users, while Custom comes in handy for developers with more specific requirements. Just keep in mind that if you go with the Custom option, you won’t be able to connect your local site to Flywheel (in order to publish it live if you so choose). It may also require downloading some additional files.

Either way, continue to the last step once you’re done here:

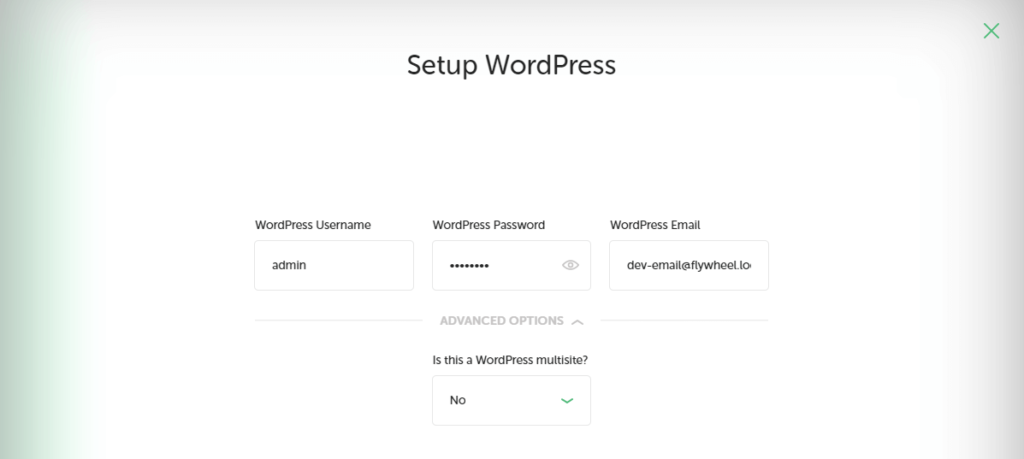
On this screen, you’ll create a WordPress username, a secure password, and an admin email address. Under Advanced Options, you can also specify if you’d like this installation to be a multisite setup. Then, hit the Add Site button.

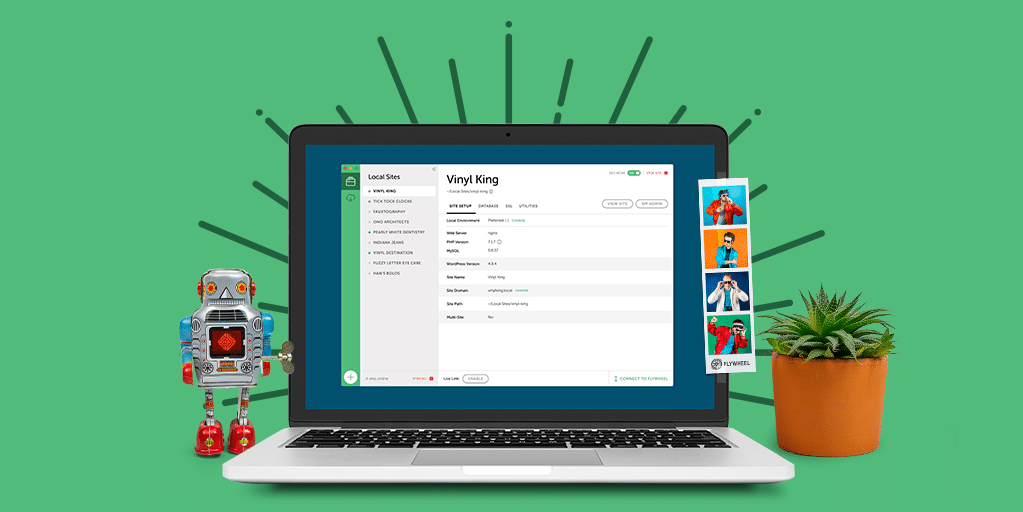
After a few moments, you’ll see your new site listed in the dashboard, along with all of its information:

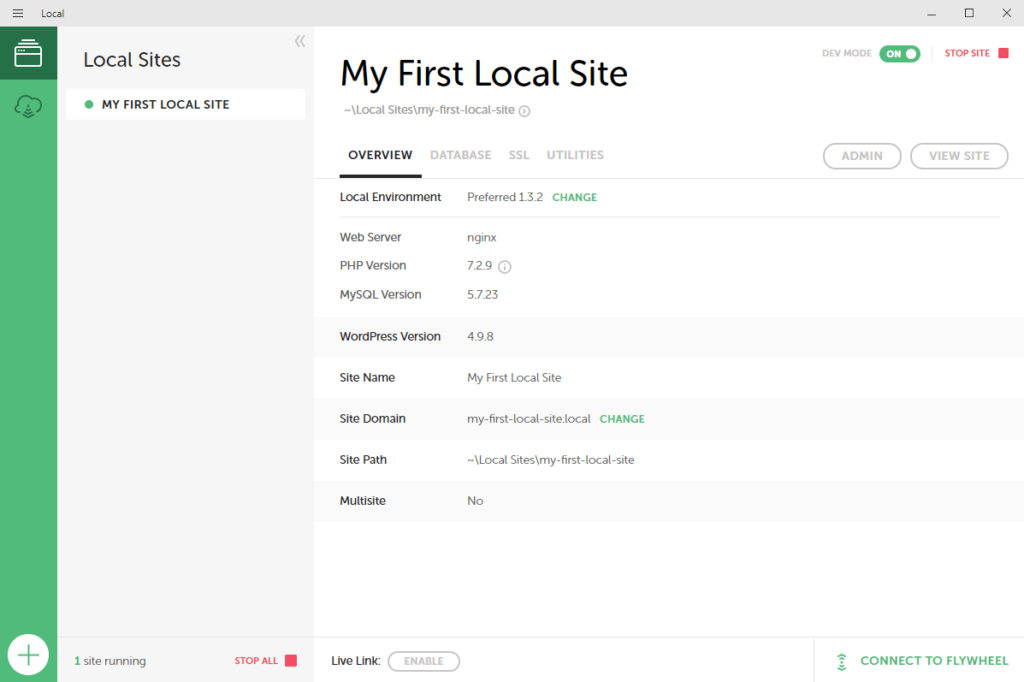
You can now select the Admin button to log into your site and get to work! In addition, you can always come back to this dashboard if you want to make changes to your local site’s setup or domain.

As a note: what you’re working with here is a fully-featured WordPress site, set up in record time! This means that you can install any plugins you want, add custom themes, break it, fix it, break it again, etc. It’s a coding playground, and there’s no risk to a live site!

Step 3: Export your site & take it live

Technically, the above two steps are all you need to set up and use a local WordPress website. However, if you’re building a site that will eventually go live, you’ll also need to know how the process works.

You can always export your local site and import it to the host of your choice. The steps to import and take a site live vary from host to host, but you’ll likely need to install a plugin, export, import, zip up some files, verify that your migration is working, etc.

We’d highly recommend Local Connect if you’re looking for a quick-click workflow. Using Local Connect, you can easily move a site between a local environment and the live environment on one of two preferred hosting providers: Flywheel and WP Engine. This dramatically streamlines the offline-editing and go-live process, and it’s totally free to use.

You can create or log into your Flywheel or WP Engine account through the Local dashboard:

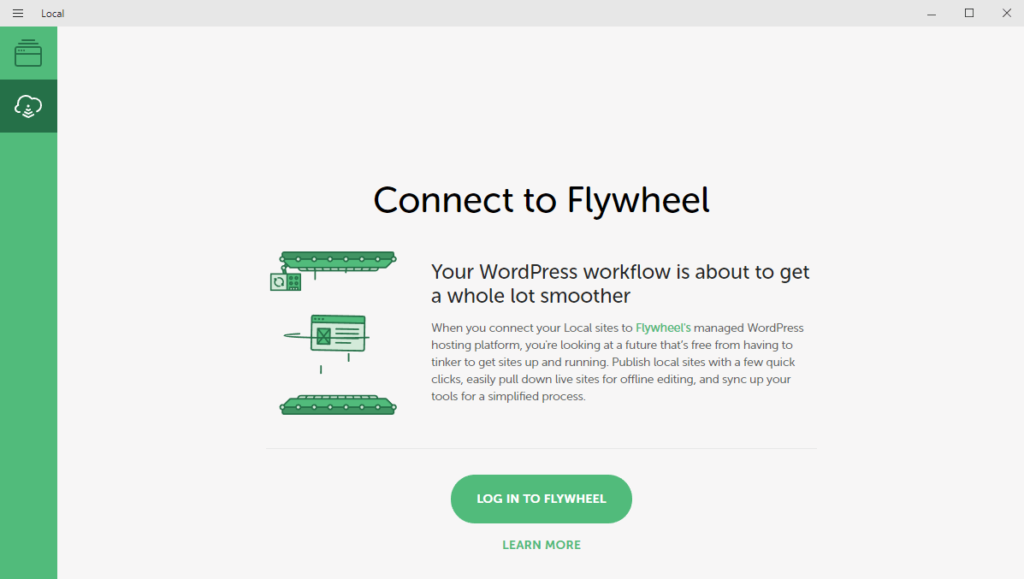
You’ll just need to enter your username and password to make the connection. After, all of your local and live sites will be listed in your Local dashboard!

From there, it’s a matter of a few clicks to push your local website live. Once your account is connected, you’ll have other options here as well. You can make a copy of a live site and turn it into a local site, for example. Then you can make changes, and copy them back over to the live version.

With that, you know everything you’ll need to create and manage development sites through Local. How you use them is up to you!

Conclusion

Being able to quickly create a local WordPress site offers numerous benefits. It lets you develop a new website in peace, and makes it easy to perform testing and troubleshooting without affecting your live site. Local enables you to do all of this easily, while offering plenty of advanced tools to enhance your local development options.

In this article, I’ve shown you how to get started with Local. All you’ll need to do is follow these three steps:

  1. Install Local.
  2. Create your local WordPress site.
  3. Export your site to Flywheel or WP Engine when it’s ready to go.

Do you have any questions about what you can do with Local? Let me know in the comments section below!

Download Local (for free!)

Stop debugging local environments and spend more time launching WordPress sites. Download it here.

How to change your WordPress login page and increase your site’s security

“Alertness is the hidden discipline of familiarity,” wrote poet David Whyte.

In a similar vein, keeping your WordPress site as secure as possible means staying attentive to some of the more mundane aspects of your site.

(Hold that yawn — don’t do it!)

We’ve written before about the importance of following WP security best practices like keeping themes and plugins up to date, and choosing a stable, performance-focused WordPress hosting company like Flywheel.

But for this post, we wanted to focus on an often-overlooked defense: custom WP login pages.

We promise this topic is less yawn-inducing — and more sexy — than it appears.

Read on to find out:

What is a WordPress login page?

Every time you open the back-end of your site to edit a post or install a plugin, you go through a WordPress login page. The default UI looks like this:

The default WordPress login page.

It’s pretty well-known that if you want to log in to any WordPress site, you simply take the URL and put /wp-admin.php at the end. Boom, there’s the login screen!

Across the internet today, you may have heard that incidences of brute force attacks are unfortunately high, particularly against WP sites. These types of attacks quickly cycle through login attempts to try to break into your site. If you’re using easy passwords like “password” or “123456789” then chances are, your site has been hacked or will be very shortly.

Brute force attacks seek to attack you where you’re most vulnerable. Successful attacks can result in hackers tampering with your site, stealing payment info, or in the worst case — taking full control of your site.

The site admin also receives the default login username “admin.” If you haven’t changed this username since you launched your site, pause here and go do that now. If hackers know your username, they’re even closer to making it into the back-end of your site.

In summary, leaving your login page unchanged with all these predictable, commonly-known default settings essentially gives hackers a major leg up when trying to break into your site.


Why changing your default WordPress login page can boost site security

By making a few simple changes to your login page, you can greatly reduce the likelihood that brute force attacks will be successful.

Use a strong password and change your default admin username. From there, there are a few other simple changes to help protect your login page, such as finding a tool that helps you limit your login attempts.

You should also consider changing your default URL to something unique that doesn’t use the predictable /wp-admin.php at the end. This alone will remove you from the ranks of WordPress site owners that haven’t bothered to adjust their default login URL.

This simple trick will make hackerswork extra hard just to find your login screen. With the other changes mentioned, you’ll be light years ahead of the status quo. (Woo!)


How to change your default WordPress login page

While you can build your own custom WP login page in CSS, there are also no-code options for those who are less tech-inclined and more time-constrained. A great choice is LoginPress, the easy no-code WordPress login page builder.

As a WordPress plugin, you just download it, design your login page using drag-and-drop tools, select your preferred settings —and you’re good to go! For a limited time, AppSumo has a lifetime deal on LoginPress for only $39.

A custom login page on WordPress.

Full customization

Not only does LoginPress allow you to customize your login page URL and limit login attempts, but you can also make your login screen look great. (And here’s the fun part!)

Security plus elegance? Yes please! Built on the Customizer API, you can live preview every change you make in real time:

Live view of changes being made on a custom WordPress login page.

If you run a membership site or manage a large team of writers, this tool lets you redesign your login page to match your brand’s exact look and feel.

Start from scratch or use one of LoginPress’s template designs to quickly implement an editable layout.

Edit the microcopy on your login page including welcome messages, error messages, and forgotten password text. Customize every element of the page — from login placement to logos to backgrounds to text fields.

Coding a login page this cohesive and visually striking would take way more time than it takes to install and configure this easy plugin. (But they also thought of you tech-savvy folks, giving you the option to edit LoginPress in CSS as well.)

An example of a custom WordPress login page.

Security

While limiting login attempts, you can also track attempts by user to further prevent brute force attacks. You can choose the login attempt limit for each user and can even preset the time each user must wait between login attempts.

For even more security, add Google reCaptcha to your login screen.

LoginPress’s Auto Login even creates unique URLs for users to bypass the login screen entirely for direct access their account. You get access to every auto-login URL in the plugin back-end so you can add/remove URLs as needed.

A snapshot of the back-end of LoginPress in WordPress.

Conclusion

With 276+ 5-star reviews on WordPress and an almost 5/5 taco rating on AppSumo, LoginPress is a popular and beginner-friendly solution for securing and customizing your login pages.

If you’re looking for a well-maintained plugin to boost WordPress login screen security and cohesiveness, this is the one for you.

And while you’re here, bookmark AppSumo’s new store of lifetime deals on powerful WordPress tools.

If you’re on the lookout for a new tool to further optimize your Flywheel-hosted site, be sure to check AppSumo’s rotating selection of exclusive WP tools including themes, plugins, and add-on packs.

Happy customizing!


Looking for more tips and tricks to keep your site secure?

There are a slew of WordPress security plugins out there, but there are actually a variety of ways to protect against security issues that don’t require a plugin (and are actually a lot better at keeping hackers out!) There’s no foolproof way to completely make your site secure, but there are some simple steps you can take to boost security and put up a good fight.

This ebook will teach you why sites get hacked in the first place and then walk you through 11 of the best security tips for WordPress. Ready? Let’s toughen up your site!

6 WordPress security tips & best practices every site owner should know

WordPress security is one of the most important topics for any site owner. Whether you’re managing a boutique eCommerce shop or 50 client sites, experiencing a security breach can mean a loss in time, money, and credibility — all things no one wants to face.

While there’s no “one-size-fits-all” security solution for every WordPress site, there are a few best practices that can make a big impact. In this article, we’ll explain why sites get hacked in the first place, share security tips that are easy to implement in your workflow, and show you how Flywheel can help (beyond keeping your server secure). Here’s a quick overview.

Follow these WordPress security best practices to keep your site secure:

Ready to boost your WordPress site security? Let’s start at the beginning!

Why do WordPress sites get hacked?

Before we jump straight into WordPress security best practices, it can be helpful to understand why websites get hacked in the first place. Generally speaking, hackers tend to target websites for the following reasons:

  • To send spam emails through your site.
  • To steal your information, such as data, mailing lists, stored credit cards, etc.
  • To trick your site into installing malware on your users’ machines (or your own).

While a security event might feel like a personal attack, it’s often part of a larger scheme, such as a Distributed Denial of Service attack. Rather than target a single site, hackers might target the infrastructure your site is operating on, affecting numerous sites at once. That’s why it’s important to know some basic WordPress security standards, even if you’re just running a personal website.

In addition to the above, WordPress may be targeted specifically, simply due to its widespread popularity. Because it now powers more than 40% of all websites, WordPress is a large “area of opportunity” for online attackers.

But that alone shouldn’t be cause for alarm. WordPress is an open source CMS with a highly dedicated and involved community of contributors, which means there are a ton of people continuously working to improve the security of the platform.

The truth is that any website can experience a security issue at any time, and the same goes for sites built with WordPress. Luckily, there are several best practices you can implement to increase the security of your WordPress sites and make it far more difficult for hackers to mess things up.


6 WordPress security best practices

1. Keep your themes, plugins, and WordPress version up to date

One of the easiest ways to give your site an extra security boost is to keep everything updated. While it might feel tedious to keep up with plugin updates (especially if you’re trying to manage multiple WordPress websites) those updates are published for a reason (which is often security-related).

If developers discover a vulnerability in their code, they’ll usually push an update to fix it. The longer your site uses the outdated version, the more likely it is to be targeted by hackers.

While it might take some time, staying up to date with all plugins, themes, and WordPress core updates is a great way to limit security risks. If you’re using a managed WordPress host, WordPress updates should be performed automatically, helping you stay on top of the latest updates to core.

When it comes to keeping your plugins updated, solutions such as Smart Plugin Manager automatically check your plugins for updates at a pre-scheduled time. Using machine learning and visual testing, Smart Plugin Manager also ensures that your site doesn’t break when updates occur.

Pro tip: If you’re managing updates for multiple client sites, you may want to consider bundling this work into a security package that you sell on a recurring basis, that way you’re getting paid for this simple but tedious task!

2. Apply username and password best practices

There’s nothing new about this security tip, but it’s absolutely worth a reminder:

Use unique passwords. Use strong usernames. Use a password manager.

Hackers weren’t born yesterday; they know all the most common passwords and will test every single one with the username “admin.” So, do a quick audit.

  • Are your usernames hard to guess?
  • Are your passwords unique?
  • Have your passwords been updated recently?

If you’re feeling overwhelmed trying to remember all these login credentials, I highly recommend a password manager, such as 1Password. Not only will it help you create and store complex credentials, it makes logging into sites a breeze. (Especially if you’re working with a team!)


3. Limit login attempts

Now that your login credentials have been strengthened, take your login security a step further by limiting login attempts! This is one of the best ways to defend against brute force attacks trying to gain access to your site.

To limit login attempts, you can use a plugin like Limit Login Attempts, which will block any attempt to log into your site after three errors, putting a block on it for twenty minutes.

Sure, it might get in your own way if you forget your password, but that’s what password managers are for, remember?


4. Move the WordPress login URL

Another way to make your WordPress site extra secure is to change the login page. It’s pretty common knowledge that to log into a site, you just add /wp-admin to the end of the URL. By changing the link, you effectively hide the entryway to your site, making it harder for hackers to find.

There are a variety of ways you can change your login URL, but the WPS Hide Login plugin is a good place to start! Just don’t forget what you change the URL to, and remember to share it with any other site collaborators or clients.


5. Use two-factor authentication

Another great way to make your credentials more secure is to use two-factor authentication. This security method acts as a temporary second password that updates every 30 seconds or so. To gain access to your site, hackers would have to guess both your true password and the temporary security code within that 30 second timeframe, greatly increasing your chances of blocking them!

Two-factor authentication is great because you can use it with a variety of logins related to the sites you manage. For example, Flywheel allows you to enable two-factor authentication on your hosting account, and you can also add it to individual WordPress sites.


6. Add Captcha to your forms

As you’ve probably gathered, locking down your site’s login page is incredibly important. That isn’t the only form you should focus on, however. Don’t forget about blog comments, checkout pages, or any other open form on your website!

Each of these forms present opportunities for hackers to submit information to your site, such as malicious links in a comment. Even if it doesn’t directly affect your site’s performance, having shady links will create a confusing user experience, and may even hurt your business.

To prevent this type of activity, you can install a WordPress plugin like Google Captcha (reCAPTCHA) by BestWebSoft.


WordPress security is an important topic for each and every site owner to understand, and while it’s a constantly evolving area of focus, the tips and best practices above should provide a solid baseline for keeping your WordPress sites safe and secure.


The post 6 WordPress security tips & best practices every site owner should know appeared first on Layout | Creative content for designers, developers, & marketers.

How to Fix the “Sorry, You Are Not Allowed to Access This Page” Error in WordPress

Are you frustrated by the “Sorry, you are not allowed to access this page” error in WordPress?

This error usually displays when you’re trying to see a page in your WordPress dashboard that your user role doesn’t have permission to see.

However, you might see the error sometimes even when you’re supposed to have access to that page. This error can be caused by lot of different reasons which makes it tricky for beginners to troubleshoot.

In this article, we’ll show you how to fix the “Sorry, you are not allowed to access this page” error in WordPress.

What Causes the “Sorry, You Are Not Allowed to Access This Page” Error in WordPress?

WordPress user roles and permissions define what your users can and can’t do in WordPress. For example, an author on your site wouldn’t be able to edit the post of another author, only their own posts.

If someone gave an author the link to edit someone else’s post, then they would see the “Sorry, you are not allowed to access this page” WordPress error when following the link.

However, sometimes you might see “Sorry, you are not allowed to access this page” when you should have access to view the page.

If you’re not the site owner or administrator, and you’re seeing this error, then you should contact the site owner or admin to let them know. They can explain why you don’t have access to the page, or they can change your role to grant you access.

If you are the site owner or have an admin role, but you’re still seeing the “Sorry, you are not allowed to access this page” error when trying to log in to your own website, then something has gone wrong with the permissions.

Maybe there was an issue with a WordPress update. Maybe there was a problem when a theme or plugin was updated. Or maybe something has gone wrong with your configuration.

If you’re seeing this error when you try to log in, then you won’t be able to fix the error by changing your WordPress settings in the dashboard. You’ll have to work with the files and databases directly.

This can be tricky for beginners and making a mistake could make things worse. As a precaution, we recommend you first make a complete backup of your WordPress website.

You could also start by contacting your hosting provider. They may be able to fix the problem for you.

That being said, here are some steps you can follow to troubleshoot and fix the “Sorry, you are not allowed to access this page” error in WordPress.

Checking You Have the Correct WordPress Role

If you’re able to log in to the WordPress dashboard, but can’t access specific pages, then the issue could be that your WordPress user role was changed, and you’re no longer an admin.

From the WordPress dashboard, you can see your user role by visiting the Users » All Users page, and looking under the ‘Role’ column.

If you don’t have access to the Users page, then this means that you are not an administrator.

If you or someone else accidentally deleted your administrator account or changed your user role, then you can add a new admin user with phpMyAdmin.

Checking for a Corrupt .htaccess File

If you have an admin user role, and you’re still seeing the “Sorry, you are not allowed to access this page” error, then it could be caused by a corrupt .htaccess file. We can check this by renaming the file.

You will need to use an FTP client or the file manager feature in your WordPress hosting account. If you haven’t used FTP before, then you may want to see our guide on how to use FTP to upload files to WordPress.

Using your FTP client, you need to navigate to the root folder containing all your WordPress files. Once you find the .htaccess file you need to rename it to something else, such as .htaccess.old.

If you cannot find your .htaccess file, then see our guide on how to find .htaccess in WordPress.

Once you rename the file, try logging onto your WordPress site to see if that has fixed the problem. If it hasn’t, then rename it back to .htaccess and move on to the next step.

If you can log in, then you fixed the problem. The next step is to generate a new .htaccess file. To do that, navigate to the Settings » Permalinks page in WordPress.

Simply click on the Save Changes button at the bottom of the page and WordPress will generate a fresh .htaccess file.

Checking for Incorrect File Permissions

While you have your FTP client open, we’ll check to make sure there isn’t a problem with your file permissions. File permissions control who can access files and folders on your website.

The following settings are recommended for most users:

755 for all folders and sub-folders.
644 for all files.

Using your FTP client, you need to navigate to the root folder containing all your WordPress files and select the wp-admin, wp-content and wp-includes folders. Then you need to right click and select ‘File Permissions’.

This will bring up the file permissions dialog box.

Now you need to enter 755 in the numeric value field. After that, you can click on the ‘Recurse into subdirectories’ checkbox and then select ‘Apply to directories only’ option.

Click on the OK button to continue. Your FTP client will start setting file permissions to folders and sub-folders. You will need to wait for it to finish.

Next, you need to select all files and folders in the root folder of your WordPress site and then right click to select file permissions.

The file permissions dialog box would appear.

This time you need to enter 644 in numeric value. After that you need to click on ‘Recurse into subdirectories’ checkbox and then select ‘Apply to files only’ option.

Click on OK to continue and your FTP client will now start setting file permission to all files on your WordPress site.

Once you’ve done this, try logging into your WordPress website again. If you’re successful, then you’ve fixed the problem. If not, then move on to the next step.

Deactivating All Plugins Using FTP

If the steps above haven’t resolved the issue, then our next step is to check whether a faulty WordPress plugin is causing the error. We’ll do that by temporarily deactivating all plugins.

First, you need to connect to your website using an FTP client. Once connected, you need to navigate to the /wp-content/ folder.

Once there, you will see a folder called plugins. This is where WordPress stores all plugins installed on your website.

You need to right click on the plugins folder and select Rename. Next, you should type in a different name. We will call it ‘plugins.deactivate’.

All of your plugins have been deactivated. Now try to log into your WordPress site to see if this has fixed the problem.

If you still receive the “Sorry, you are not allowed to access this page” error, then the problem isn’t caused by a plugin. You’ll need to rename the ‘plugins.deactivate’ folder back to ‘plugins’ and move on to the next step.

If you can now log in, then you know that one of the plugins is causing the error. We just have to find out which one.

Using your FTP client, rename the ‘plugins.deactivate’ folder back to ‘plugins’ then navigate inside the plugins folder. Now rename the first plugin to something like ‘plugin-name.deactivate’.

Now go back to your site to see if you can log in. If you can’t, then change the plugin’s name back and move on to the second plugin. Repeat the process until you find the one that caused the issue.

Once you’ve found the faulty one, you can switch to a different plugin that doesn’t cause the problem. Or you can contact the plugin author and work with them to come up with a solution.

Activating the Default Theme Using FTP

If the plugin solution didn’t work for you, then we’ll need to check if your WordPress theme could be causing this issue.

This step is similar to deactivating your plugins. You’ll need to connect to your website using an FTP client and navigate to the wp-content folder.

Once there, you will see a folder called themes. This is where WordPress stores all themes installed on your website.

This time you need to right-click on the plugins folder and select Rename. We’ll call it ‘themes.deactivate’.

This will activate the default theme. Now try to log into your WordPress site to see if this has fixed the problem.

If you still receive the “Sorry, you are not allowed to access this page” error, then the problem isn’t caused by a theme. You need to rename the ‘themes.deactivate’ folder back to ‘themes’ and move on to the next step.

If you can log in, then the previous theme caused the problem and you can start to troubleshoot. You could try using a different theme or reinstall the same theme and carefully configure it.

If the error returns, then report it to the theme author. They may be able to help you solve the problem or fix a bug in the theme.

Final Troubleshooting Steps

If you’re still reading, then unfortunately the other steps haven’t solved your problem. Here are a few more things you can try.

Check Error Log

You may be able to check an error log for clues about what went wrong. Your hosting provider may be keeping logs, or you may have previously set WordPress up to keep them.

For more details, check our guide on how to set up WordPress error logs, or contact your hosting provider.

Update to Latest PHP

If your WordPress site is running an older version of PHP, then it may be causing problems. Upgrading to the latest version may be helpful.

For more information, check our guide on how PHP updates by your web host impact your WordPress site, or contact your hosting provider.

Restore Your Most Recent Backup

If you’ve made a recent backup of your WordPress website, then restoring it to an earlier version is likely to fix the “Sorry, you are not allowed to access this page” error.

The problem is, you will lose any changes to your settings and content made after the backup.

For more information, check our beginner’s guide on how to restore WordPress from backup.

Contact Your Hosting Provider

If you are unable to fix the error on your own, then you should contact your WordPress hosting company to see if there is anything they can do.

Many providers offer excellent technical support and may be able to solve the problem for you.

For example, they may be able to check their server error logs or have created their own backups of your WordPress site. They will be able to advise you on how they can help and what you should do next.

For the best results, make sure you check our guide on how to properly ask for WordPress support and get it.

We hope this tutorial helped you learn how to fix the “Sorry, you are not allowed to access this page” error in WordPress. You may also want to bookmark our ultimate troubleshooting guide of the most common WordPress errors, or see our guide on how to get a free email domain.

How to Properly Setup SAML Single Sign-On (SSO) in WordPress

Do you want to learn how to properly setup SAML single sign-on (SSO) in WordPress?

Adding single sign-on to WordPress lets your users quickly and securely login to your WordPress site without having to remember a username and password.

Instead they can use their Google login, Okta, or one of the many other SSO services.

In this article, we’ll show you how to properly setup SAML single sign-on in WordPress, step by step.

Why Add SAML Single Sign On to WordPress?

SAML SSO is an open protocol that lets users login to multiple websites using the same credentials. For example, with single sign on you can log in to WordPress with your Google account.

This improves user satisfaction because they won’t have to go through the password reset process and can use an existing login instead.

From a website owner’s point of view, it lets you verify your users’ identities during login through a trusted provider which improves your WordPress security.

Single sign-on is very beneficial for internal company websites. Company admin / HR team loves it because it makes it easy to onboard new team members to multiple websites.

We use single-sign on for our internal company websites at Awesome Motive, so our team members can login across multiple websites using their company Gmail account without having to remember separate passwords.

That being said, we’re going to share two different WordPress plugins that can help you setup SAML SSO in WordPress. Simply use the quick links below to choose the WordPress plugin you want to use.

Method 1. Setup SAML SSO with Google Apps Login

We recommend using the Google Apps Login plugin to easily set up SAML single sign-on in WordPress. It’s what we use here at WPBeginner so our team members can login to WordPress with their Google accounts.

The plugin is very easy to use and lets you give your users, employees, or students the option to sign in quickly with a secure Google login.

First thing you need to do is install and activate the plugin. For more details, see our step by step guide on how to install a WordPress plugin.

Once the plugin is activated, you need to navigate to the Google Cloud Platform Console to create a new API, so you can link your Google account and WordPress together.

To create the new API, first click the ‘Select a project’ drop-down menu at the top of the screen.

Your screen may look slightly different if you’ve already created a Google developer project, but you can still simply click the same drop down arrow to create a new project.

This will bring up a popup window.

Here you need to click the ‘New Project’ button in the right-hand corner.

On the next screen, you need to name your project in the ‘Project name’ box. This will help you remember the purpose of the project, but it won’t appear to your visitors.

You also need to make sure the ‘Organization’ and ‘Location’ match your website’s domain name.

After that, click the ‘Create’ button.

After the project is created, there will be a drop down notifications menu that shows your new project.

Click the ‘Select Project’ button to open up the project.

Next, click the ‘OAuth consent screen’ option in the left-hand menu.

Here you have two options to choose from. The ‘External’ option makes sense if you have a membership site or sell online courses and want to allow your users to login with Google.

The ‘Internal’ option only lets users within your company use the Google login. For this option, you need to have a premium Google Workspace account and your users need to be added as team members.

Whether you select Internal or External, every user that needs to login has to have an existing WordPress account set up under their Gmail address. Otherwise, they won’t be able to log in.

For more details, see our guide on how to add new users to WordPress.

With that said, we’ll select the ‘External’ option, since this gives us more flexibility about who can login.

After that, click the ‘Create’ button.

This brings you to a screen to enter your app details. First, you need to enter your ‘App name’ and select the ‘User support email’ from the drop down list.

Then, enter your ‘App domain’ information. You need to fill out all three fields.

Google needs this information to make sure that your website complies with online privacy regulations and user consent.

After that, scroll down to the ‘Authorized domains’ section.

Then, click the ‘Add Domain’ button to bring up a box where you’ll enter your domain name.

Make sure you enter your domain without the http:// or https://.

Next, enter your email in the ‘Developer contact information box’, so Google can get in touch if there’s an issue with your project.

Then, click the ‘Save and Continue’ button.

After that, click the ‘Credentials’ option in the navigation menu on the left-hand side of the page and then click ‘Create Credentials’.

This brings up a drop down menu.

You need to select the ‘OAuth client ID’ option.

On the next screen, click the ‘Application type’ drop down.

Then, select ‘Web application’ from the list.

This will bring up a form where you can give your web app a name.

The name is only for your own reference, it won’t appear to your visitors.

Next, scroll down to the ‘Authorized Javascript origins’ section.

Then, click the ‘Add URL’ button and enter the URL for your website.

After that, click the ‘Add URL’ button in the ‘Authorized redirect URLs’ section and enter your login redirect URL.

This URL is the URL of your login page. For most WordPress websites, this will be ‘yoursite.com/wp-login.php’.

After that, click the ‘Create’ button.

This brings up a popup that has your ‘Client ID’ and ‘Client Secret’. You need to copy both of these into your favorite text editor.

Now you need to navigate back to your WordPress admin panel and go to Settings » Google Apps Login.

On this screen, you’ll enter the ‘Client ID” and the ‘Client Secret’ strings that you copied from above.

After that, click ‘Save Changes’.

Once you’ve done that, Google single sign-on will be enabled. Now, when you or a visitor goes to the WordPress login page, they can login with their Google account in a couple of clicks.

Method 2. Setup SAML SSO with SAML Single Sign On

This method involves using the SAML Single Sign On plugin. This plugin lets you add SAML SSO to WordPress and supports a variety of different logins.

For example, you can add SSO with Google, Salesforce, Microsoft Office 365, OneLogin, Azure, and more. Since it supports various business tools, it’s more suited for businesses who want to allow only team members to log in.

First thing you need to do is install and activate the plugin. For more details, see our beginner’s guide on how to install a WordPress plugin.

Upon activation, navigate to miniOrange SAML 2.0 SSO » Plugin Configuration to bring up the plugin settings screen.

Here, you need to select your service provider. This is the service your users will be using to login.

For this tutorial, we’ll be using ‘Google Apps’, but you can select the best provider for your website. The integration steps will be similar.

In order to set up SSO with Google Apps, you need a Google Workspace account. Google Workspace is a collection of premium productivity and business tools from Google.

You also need to create a WordPress account for every user you want to give login access to. The email address for each user needs to be a Gmail account, or a team member email from Google Workspace.

For more details, see our guide on how to add new users and authors to WordPress.

Once you have a premium Google Workspace account, you can move forward with setting up SSO in WordPress.

Next, click on the ‘Service Provider Metadata’ menu option.

Then, scroll down the page until you find the chart where your ‘SP-EntityID/Issuer’ and ‘ACS URL’ are listed.

Copy both of these and paste them into your favorite text editor.

Once you’ve done that, you need to open up your Google Admin console in a new tab.

Then, go to Apps » Web and mobile apps in the left-hand navigation menu.

After that, click the ‘Add App’ drop down.

Then, select the ‘Add custom SAML app’ option.

On the next screen, you’ll need to give your app a name, and you can upload a custom logo if you’d like.

Then, click the ‘Continue’ button.

For the next step, you have two different options.

The easiest option is ‘Option 1’, all you have to do is click the ‘Download Metadata’ button. You’ll need to upload this data to WordPress at a later step.

After that, click ‘Continue’ at the bottom of the screen.

This will bring you to a screen where you can paste your ‘ACS URL’ and ‘Entity ID’ that you copied earlier.

Then, check the ‘Signed response’ checkbox.

Next, select ‘EMAIL’ from the ‘Name ID format’ drop down.

Then, click ‘Continue’ at the bottom of the screen.

On the next screen, you need to click the ‘Add Mapping’ button.

This will map the data from your WordPress login form to Google.

Next, select the ‘First name’ field in the ‘Basic information’ section and type ‘firstname’ into the ‘App attributes’ box.

Then, click the ‘Add Mapping’ button, select the ‘Last name’ field, and type ‘lastname’ into the ‘App attributes’ box.

Once you’ve done that, click the ‘Finish’ button.

Now, you’ll be taken back to the SAML app you just created. Select your app, and then click on the ‘User access’ section.

Then, in the ‘Service status’ box, click the ‘ON for everyone’ radio button.

After that, click ‘Save’.

You’ve now successfully created and enabled your SAML SSO app.

Now, go back to your WordPress admin panel and navigate to miniOrange SAML 2.0 SSO » Plugin Configuration.

On this screen, make sure that ‘Google Apps’ is selected and scroll down to the ‘Configure Service Provider’ section and click the ‘Upload IDP Metadata File/XML’ button.

Now, type ‘Google’ into the ‘Identity Provider Name’ box and click the ‘Choose File’ button.

Then, select the XML file that you downloaded earlier and click the ‘Upload’ button.

After that, click the ‘Attribute/Role Mapping’ menu option.

With the free version of the plugin, you have to keep the default attribute options.

Then, scroll down to the ‘Role Mapping’ section.

Here you can change the default role, which will be assigned to all non-admin users when they login with SSO.

If it isn’t already selected, then select ‘Subscriber’ from the drop down list and click the ‘Save’ button at the bottom of the screen.

Now you need to add a simple login link to your WordPress blog.

To do this, navigate to Appearance » Widgets and look for the widget area you’d like to add your login link to. In this tutorial, we’re adding our login widget to our Right Sidebar widget area.

Under the widget area, click the ‘+’ icon to add a new block.

Then, type ‘Login’ into the search bar so you can find and select the ‘Login with Google’ widget.

This will insert a ‘Login with Google’ link into the widget area.

You can also add a title to the login block, if you like.

Make sure to click the ‘Update’ button before you leave the page.

Now when your users are on your website, they have the option to login with their Google accounts.

When they click the link they’ll be taken to the Google login screen to select their account.

We hope this article helped you learn how to properly setup SAML single sign-on in WordPress. You may also want to see our guide on how to get a free email domain, or our expert comparison of the best business phone services for small business.

How to Change ‘Howdy Admin’ in WordPress (The Easy Way)

Do you want to change or remove the ‘Howdy’ greeting that is displayed on the WordPress admin bar after logging in?

Many people never use that word in real life. You might like to change it to a greeting that sounds more familiar.

In this article, we’ll show you how to change or remove ‘Howdy Admin’ with 3 easy solutions.

Why Change ‘Howdy Admin’?

Whenever a user logs into the dashboard of their WordPress website, they are greeted by the word ‘Howdy’ followed by their display name.

For example, if John Smith logged in, then he’d see the words ‘Howdy, John Smith’ near the top right of the screen.

That greeting might not sound natural to some users. ‘Howdy’ is short for ‘How do you do?’, but many English speakers never use the word. It may sound out of place, outdated, or even a bit annoying.

Luckily, you can change the greeting to something that sounds more familiar, like Welcome, Hello, Hey, or Hi. You can also leave it out entirely, so you’ll just see the user’s display name.

There are a few ways to change or remove ‘Howdy Admin’ and we’ll show you three. The first two methods are easiest and use a plugin.

You only need to use one of these methods. Simply click the link below to skip to the method that best suits your needs:

Method 1: Removing ‘Howdy Admin’ Using a Plugin

First, you need to install and activate the Admin Trim Interface plugin. For more details, see our step by step guide on how to install a WordPress plugin.

The Admin Trim Interface plugin lets you remove features you don’t need from the WordPress admin area, including the ‘Howdy’ greeting. Once you remove it, you’ll just see the username with no greeting.

Once you activate the plugin, go to the Appearance » Admin Trim Interface page in your WordPress dashboard. Here you will see the list of ten interface elements that can be hidden.

All you need to do now is click the Hide “Howdy” checkbox, and then click the Save Changes button.

When you look at the top of the screen now, you’ll notice that the ‘Howdy’ greeting has been removed.

Method 2: Changing ‘Howdy Admin’ Using a Plugin

For the second method, you need to install and activate the Admin Customizer plugin. For more details, see our step by step guide on how to install a WordPress plugin.

Admin Customizer lets you customize your WordPress login screen and admin area, including changing the word ‘Howdy’ to something else.

Once you activate the plugin, go to the Settings » AS Admin Customizer page in your WordPress dashboard. To change the greeting, you’ll need to click on the Dashboard Section button.

Next, type your preferred greeting in the Update the Howdy Text text box and make sure you click the Save Changes button. We’ll type the word ‘Welcome’.

Tip: You don’t need to type a comma. That will be added automatically.

Now you can see in your dashboard that the ‘Howdy’ greeting has been changed to ‘Welcome’.

Method 3: Change or Remove ‘Howdy Admin’ Using Code

You can also change or remove ‘Howdy Admin’ without using a plugin by adding a custom code snippet to your theme’s functions.php file. We don’t recommend this method to inexperienced users, because even a small mistake could break your website.

If this is your first time adding code to your WordPress files, then you should check out our guide on how to copy and paste code snippets in WordPress.

We’ll use the Code Snippets plugin mentioned in that guide, so you’ll need to install that first. For more details, see our step by step guide on how to install a WordPress plugin.

Upon activation, the plugin will add a new menu item labeled Snippets to your WordPress admin bar. When you click it, you’ll see a list of example custom code snippets.

Go ahead and click on the Add New button to add your first custom code snippet in WordPress.

This will bring you to the ‘Add New Snippet’ page.

You need to start by entering a title for your custom code snippet. Let’s call it Howdy Admin. After that, copy and paste the code snippet below into the code box.

add_filter( 'admin_bar_menu', 'replace_wordpress_howdy', 25 );
function replace_wordpress_howdy( $wp_admin_bar ) {
$my_account = $wp_admin_bar->get_node('my-account');
$newtext = str_replace( 'Howdy,', 'Welcome,', $my_account->title );
$wp_admin_bar->add_node( array(
'id' => 'my-account',
'title' => $newtext,
) );
}</code>

Notice that Line 4 replaces the word ‘Howdy’ with ‘Welcome’.

When you come across this snippet in the future, you may not remember what it’s for. So it’s a good idea to type something helpful in the description as a reminder.

You can also assign tags to your code snippet. This will help you sort your code snippets by topic and functionality.

Finally, you can click on the ‘Save Changes and Activate’ button. Once the snippet is activated, the ‘Howdy’ greeting will be replaced with ‘Welcome’.

To use a different greeting, just replace the word ‘Welcome’ on Line 4 with something else, such as ‘Hello’. To remove the greeting altogether, delete the word ‘Welcome’ and the comma so there is nothing between the second set of quotes on Line 4, like this.

add_filter( 'admin_bar_menu', 'replace_wordpress_howdy', 25 );
function replace_wordpress_howdy( $wp_admin_bar ) {
$my_account = $wp_admin_bar->get_node('my-account');
$newtext = str_replace( 'Howdy,', '', $my_account->title );
$wp_admin_bar->add_node( array(
'id' => 'my-account',
'title' => $newtext,
) );
}

If you’d like to return to the ‘Howdy’ greeting, then just turn off the switch on the Snippets page.

Alternatively, you can click the Save Changes and Deactivate button at the bottom of the Edit Snippet page.

We hope this article helped you learn how to customize the greeting in the WordPress backend. Next, see our guide on how to choose the best WordPress hosting, or check out our list of must have WordPress plugins to grow your website.

Exit mobile version